To make use of Raspberry pi it is required to have certain tool arsenal installed in your pi. This post covers what i commonly use.
- Updating Existing Packages
- AMP Stack
- Python 2.7 (Yes i have not updated to Python 3 yet. Because laziness)
I will make this quick and short. So lets get started.
Updating the Packages
Though most of the essentials come pre packed with the Raspbian. But in cases like mine where i am using very older version of raspbian, there is a need to install them.
Before starting any installation it is recommended to update the available packeges in the raspberry pi. Either of the commands are fine to do the same.
sudo apt-get update
sudo apt update
Additionally Installed packages can be list by using the command
sudo apt list
Instllaed packages can be updated by using the command
sudo apt upgrade
In few minutes all the packages will be updated to the newer versions.
AMP Stack
AMP is Apache2, MySQL and PHP. I usually have an Apache, MySQL and PhP running on my raspberry pi. As most of my pi applications are related to local servers.
Installing Apache2
sudo apt-get install apache2
Your apache is installed. If you are already on SSH you already have your ip and can check whether the service is started or not. If the service is not started you can type the command below to jump start apache2 service.
sudo service apache2 start
Go ahead and feel free to use your apache from here. Remember your files for apache are hosted at location
/var/www/html
Installing MySQL
sudo apt-get install mysql-server
You mysql server is now installed. This is the database service that i use in most of my applications.
Lets run a script to configure our mysql. This scripts comes with the package and can be used to configure the database and its security to your taste.
sudo mysq_secure_installation
You will get a screen like the following:
 |
| mysql_secure_installation |
Here the default password is
root. You have an option to change this password after this step.
 |
| Change the root Password |
Here is where you can decide whether you want to change the root password or not. I am going to keep it the same for purpose of simplicity.
Next it will ask if you want to remove the anonymous users.
 |
| Remove Anonymous users from the database |
Next it will ask you whether you want to allow remote login through root.
 |
| Allow Remote Login through Root |
I usually keep this yes in raspberry pi as it allows me flexibility to control the database anywhere from my local network. It is secure for me as i am the only one accessing my cabled local network. In case of a wifi only network you can select this option to No.
Next is the removal of Test database. I remove cause i dont need it.
 |
| Remove Test Database and Its Access |
Next is to reload privilege table. This as the text says ensure that the changes that has been done is reflected instantly.
 |
| Reload Privilege Table |
Thats it our MySQL server is now ready to use.
 |
| Database Ready to use |
But lets wait for a momemt before we access the database. I like to work with Phpmyadmin. So lets have it installed and then we will start the database access.
Installing PhP
To install Php the command is as follows:
sudo apt-get install php
But in order to php working we need apache to enable to use php. Also to access our mysql data base we need another package. So the command will now look something like the following:
sudo apt-get install php libapache2-mod-php php-mysql
Here the
libapache2-mod-php is a php module of apache that allows php to work with apache. The package
php-mysql is the package that allows php to communicate with the installed
mysql-server
To test out php it is pretty simple setups. We will create a small php file and get the installed php info,
sudo nano /var/www/html/info_php.php
The code in the file will be something like the following:
<?php

phpinfo();

?>
Following are the snapshots that will help you visualize.
 |
| The PhP Info file |
The file is located at
/var/www/html/info_php.php
Something like this will be shown on the browser.
 |
| Browser Screenshot of PhPInfo |
Now your php is installed.
Installing PhpMyAdmin
To access the sql database from the browser you need a utility like Phpmyadmin to install the commands are again simple.
sudo apt-get install phpmyadmin php-mbstring php-gettext
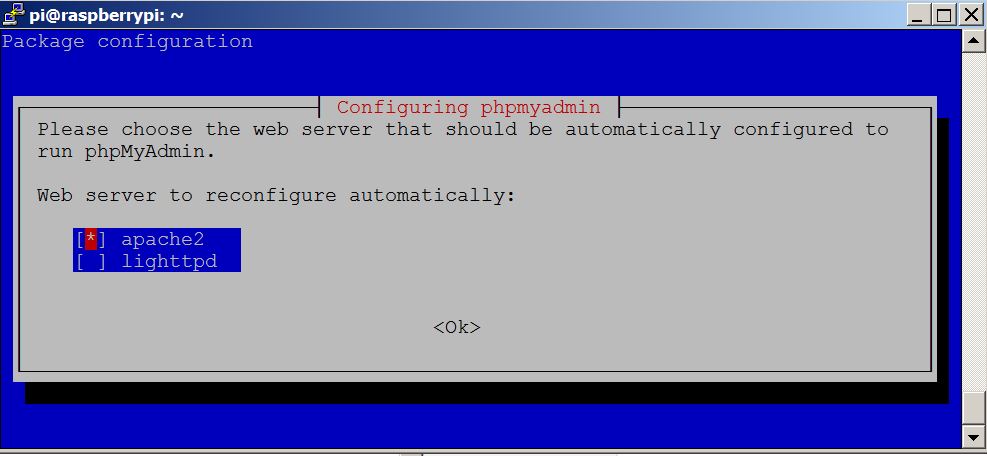
After installation you will get a setup prompt something like the following:
 |
| The Web Server Prompt for PhpMyAdmin |
This is where you select with what web server you want to configure
phpmyadmin with. Here i have selected the apache2. This will execute the
dbconfig-common and set up the database. If you dont do this selection no action will be taken and the
phpmyadmin will go unconfigured and you may need to repeat the process with
dbconfig-common again.
Now the dbconfig-common popup will come. Looks something like follows:
 |
| Configuring phpmyadmin |
After this you will be asked whether to use the dbconfig-common to configure the phpmyadmin. This is personal choice whether you want to configure or want to manually configure. I prefer to do it this way.
 |
| Configuring phpmyadmin with dbconfig-common |
Once you click yes you will be prompted to provide the phpmyadmin with the mysql password. Put in the root password and continue.
 |
| phpmyadmin mysql password |
After that ofcourse it will again ask you to confirm the password that you provided.
 |
| phpmyadmin password confirmation |
After password confirmation it will invoke the apache to configure phpmyadmin and we are all done and set to use it.
 |
| phpmyadmin process completed. |
Now to see whether it is working browse to the browser and check it.
 |
| phpmyadmin access over the browser. |
We are all done. We now have a functioning
apache,
mysql and a
php. Plus we have a web interface to manipulate the
mysql tables.
Installing Python 2.7
Okay to be hones this is not actually required but it is good to know how to do the same just in case you need to update from older raspbian to the newer raspbian. The command is straigthforward.
sudo apt-get install python2.7
If you already have a latest version this will do nothing. If you have an older release this will just upgrade and if you dont have it, it will be installed. The version can be checked by typing the command below:
python --version


No comments:
Post a Comment